Project Schedule - Introduction
Steps:
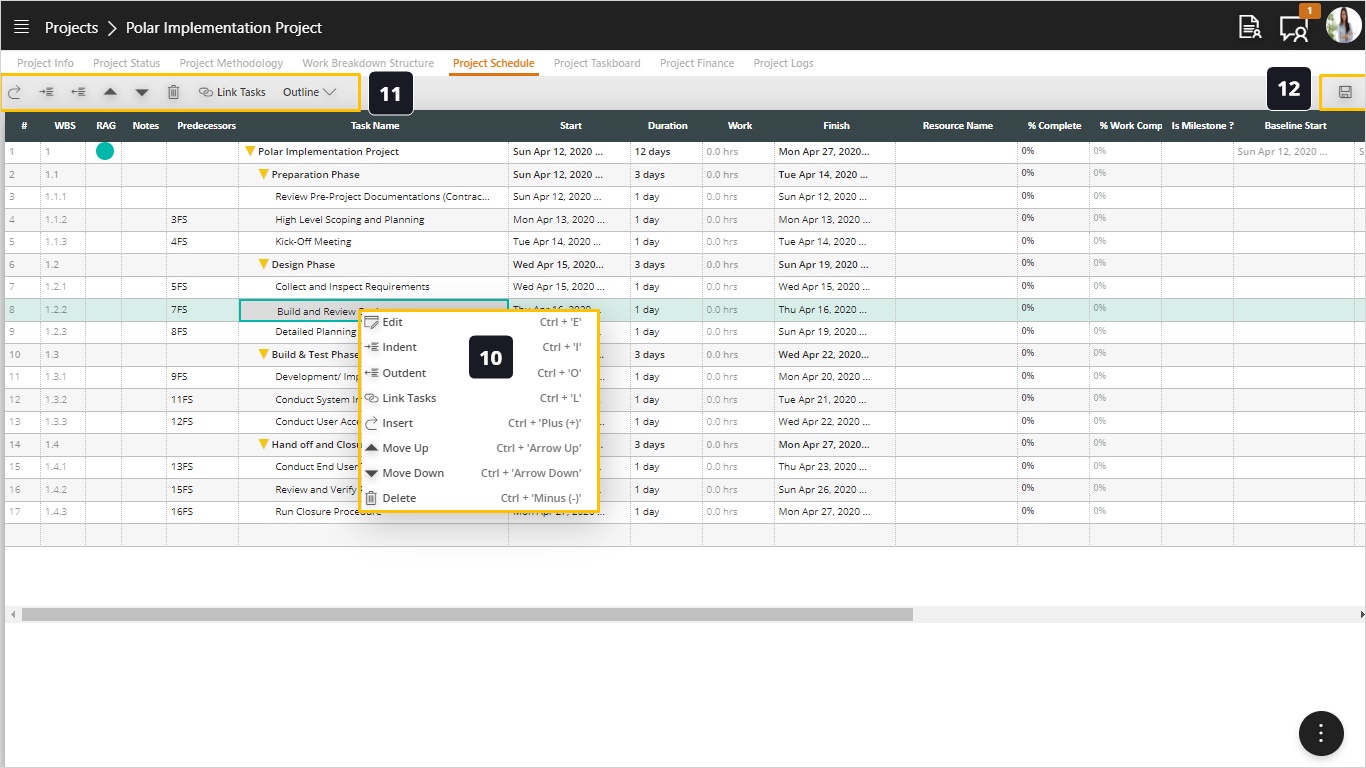
- Click on the Project Schedule Tab.
- Observe the body of the schedule, made up of rows (tasks) and columns (attributes). It is very similar to MS Project so if you are familiar with that tool you can easily manipulate this schedule.
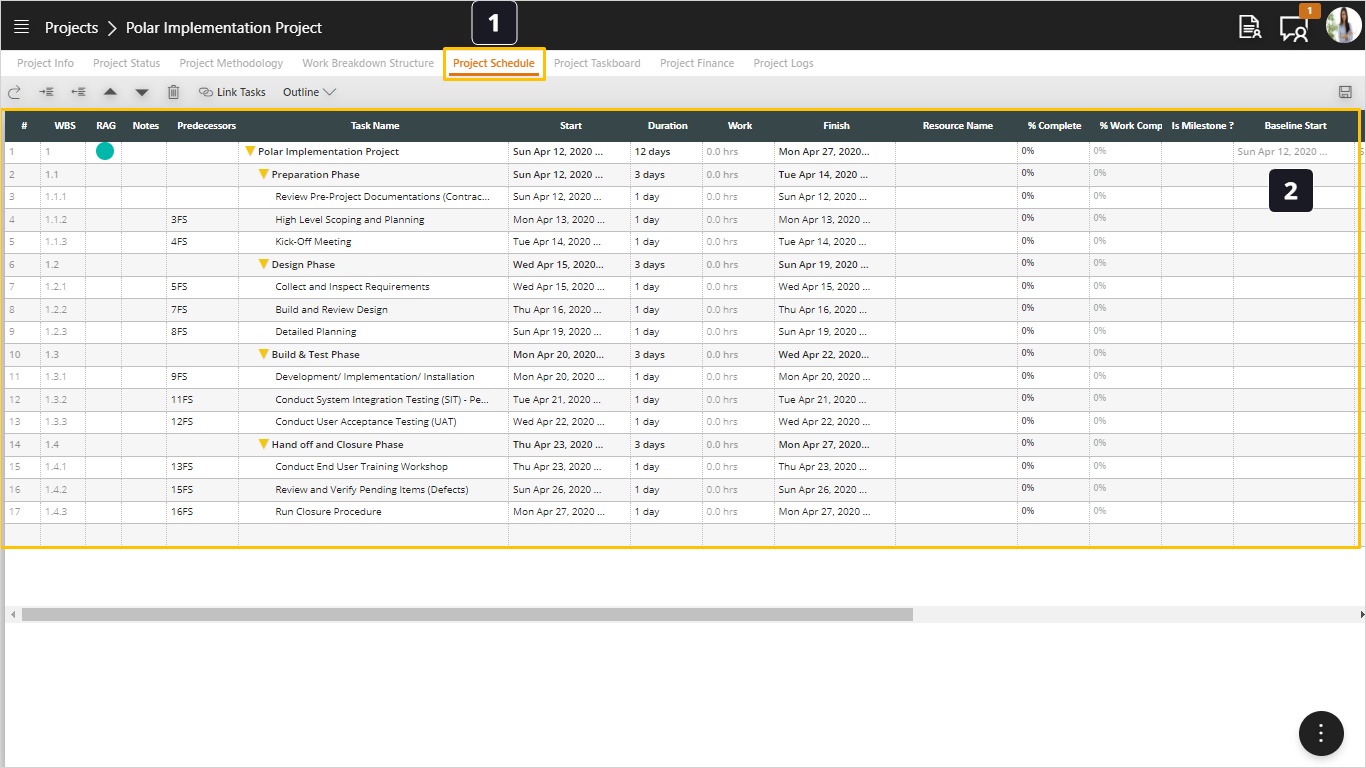
- To get started open the FAB menu to start working on your schedule.
- From the FAB menu select the Upload Schedule Template. The purpose of this feature is to provide a quick start for you to copy from existing schedule templates.
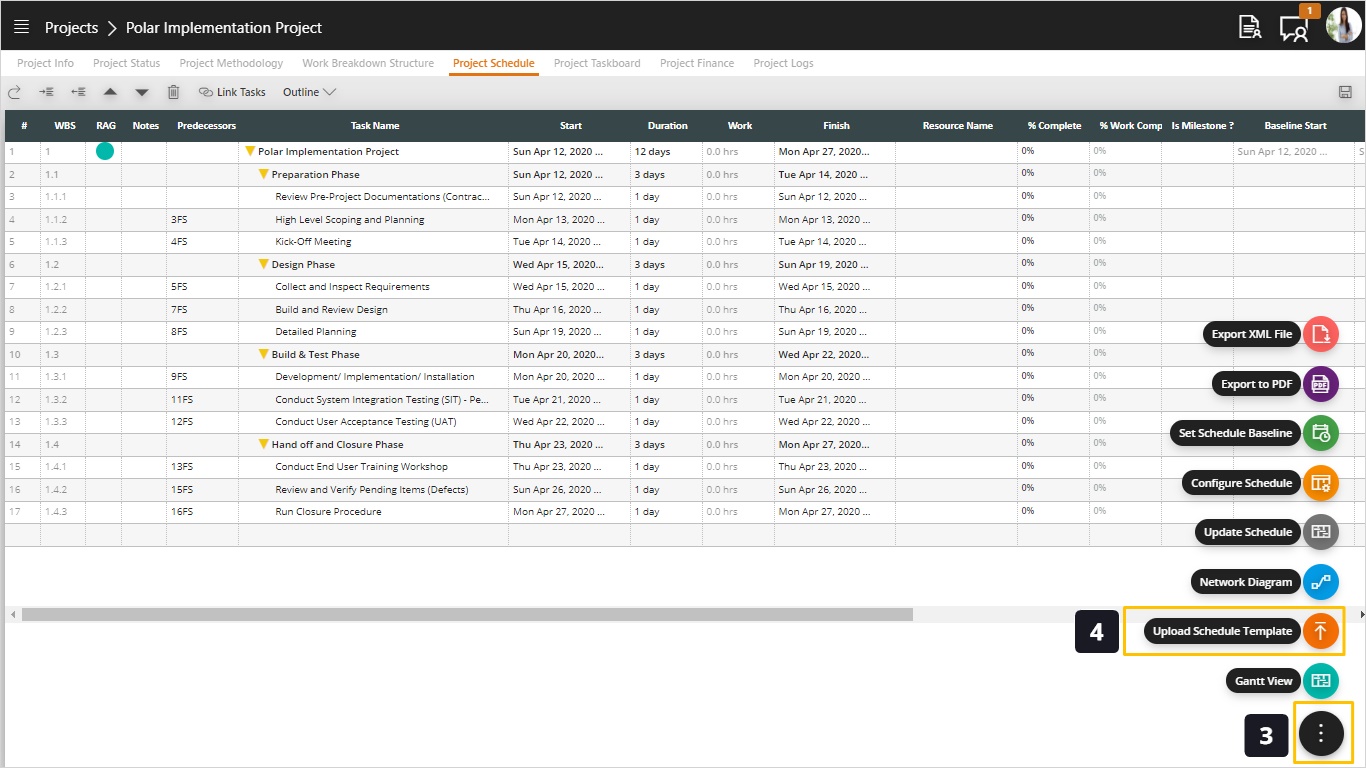
- Once inside the Upload Schedule dialog, you can find several options including:
- Methodology Schedule Template. This would be usually defined by the PMO team in the methodology linked to this project. This would represent the best practice or typical schedule for this kind of projects.
- Work Breakdown Structure – WBS. With this option you can reset the schedule to match your WBS which you configured earlier. The WBS typically includes the project methodology together with the deliverables you defined for this project.
- Copy from Project. When you have several projects of the same nature, it would be useful to copy a project schedule from an existing and similar project. This would save a lot of time because you would get the tasks, resources, durations, and dependencies from the original project.
- Upload from MS Project 2016 – XML. This is a special option available only to PMO Administrator user. This function is not available in the upcoming screenshot because this is not an Admin User. This option allows you to create the schedule from an external MS Project file, typically provided by an external party like a vendor.
- Click Upload.
- Please don’t forget to save your schedule.
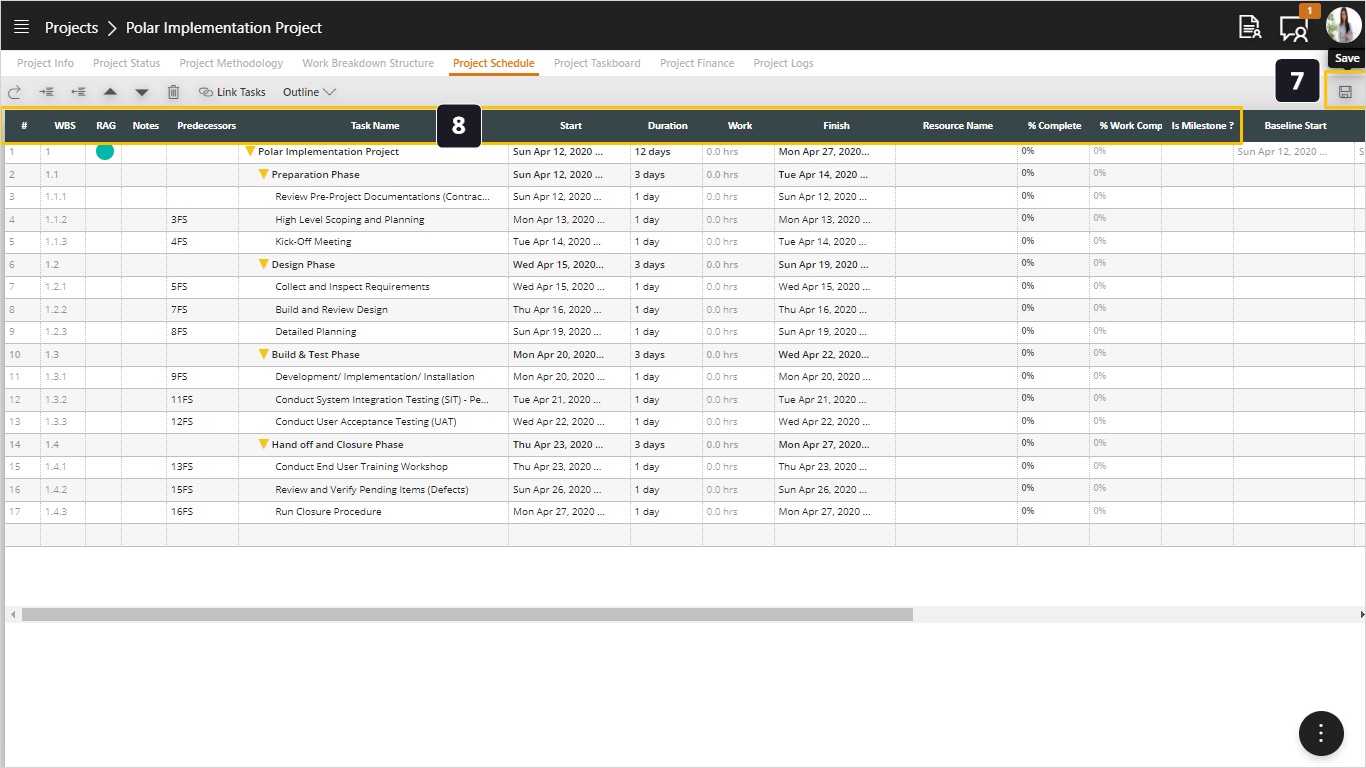
- As you can see the schedule includes several columns, which we will explain in two parts, below is the first part:
- #. This is an auto-generated number to uniquely identify each row.
- WBS. This is the Work Breakdown Structure ID or Code, this reflects the hierarchy by showing sub-deliverables, tasks, or activities with sub-number (example, 1.3.1).
- RAG. This is a Red, Amber, Green indicator which shows the status of the task or project. This calculation depends on the baseline start date and finish date of the project, in addition to the level of tolerance which is an additional margin within which the project would be Amber. For example, if your project baseline starts on 1/1/2020 and finishes on 31/3/2020, with a 10% tolerance (acceptable variance) so the baseline finish date after tolerance would be April 8th 2020. The original baseline and the tolerance are typically specified by the PMO. When the finish date of your schedule is within 1/1/2020 and 31/3/2020 it would have a Green indicator. In the period between 31/3/2020 and April 8th it would be in the Amber zone, however, once it exceeds April 8th it would become Red.
- Notes. Here you can specify any comments, notes, or explanations on the activity or task level.
- Predecessors. This is where you define the relationships between tasks, including finish-to-start, start-to-start, and finish-to-finish. Here you can also specify the lead and lag time which will be explained later.
- Task Name. This is the name of the task, activity, or parent task.
- Start. This is the start date of the activity.
- Duration. This is the duration of the task.
- Work. This is calculated from the duration, multiplied by the number of resources and their percentage of allocation on the task. For example, if two resources are assigned with 50% allocation, on a task with duration of 10 days, the total work will be 80 hours (10 days duration *8 hours per day * 2 resources * 0.5 allocation) hours.
- Finish. This date is calculated from the start date and finish date. If you manually change this date it will extend the duration.
- Resource Name. Select one or more resources that will be assigned to the task. This will allow those resources to access the task on their taskboard.
- % Complete. Calculated based on the duration column, this is the percentage completed of the task. This can be set manually on the task or automatically when resources move their tasks throughout the taskboard, according to the progress rules defined for this project (0/100, 50/50, and 20/80). On the parent level it is aggregated proportionate to the duration of the tasks.
- % Work Complete. This is very similar to the % Completed but it is calculated based on the Work column.
- Is Milestone? Indicates if the task is milestone. Notice that any task with zero duration is marked as milestone. However, we can convert any task to a milestone.
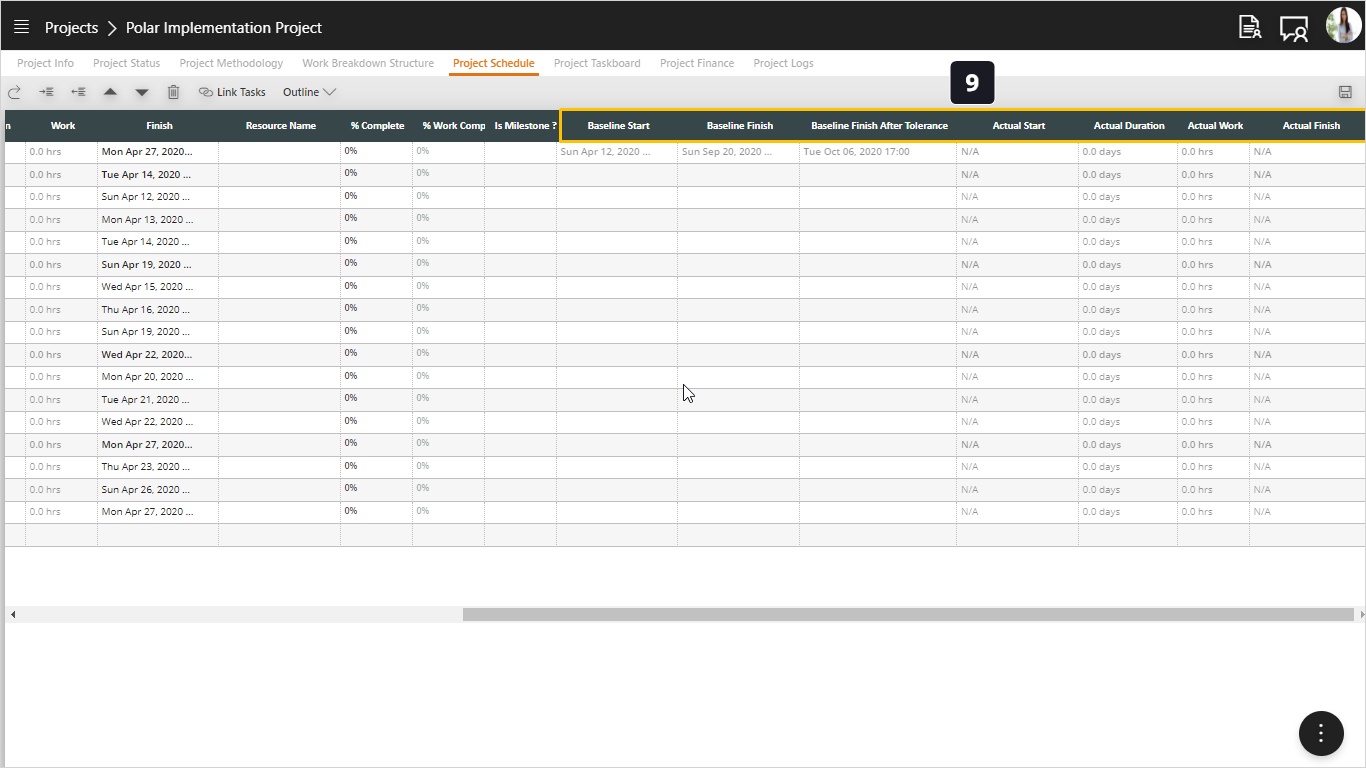
- Here we have the rest of the columns in the schedule. Notice that all of the following columns are disabled and set automatically for you by the tool:
- Baseline start. This is the start date approved in the latest baseline for this project. Notice that the RAG indicator is calculated based on this date.
- Baseline finish. This is finish date specified in the latest approved baseline for this project. This is also used in the RAG calculations.
- Baseline finish after tolerance. This is the adjusted finish date to consider the schedule acceptable variance.
- Actual start. This is the same as the start date of the project.
- Actual duration. This is the actual duration, automatically set when the task has progress more than zero, based on the % complete.
- Actual work. This is calculated based on the % Work Completed.
- Actual finish. This is stamped by the application when % complete for this task reaches 100%.
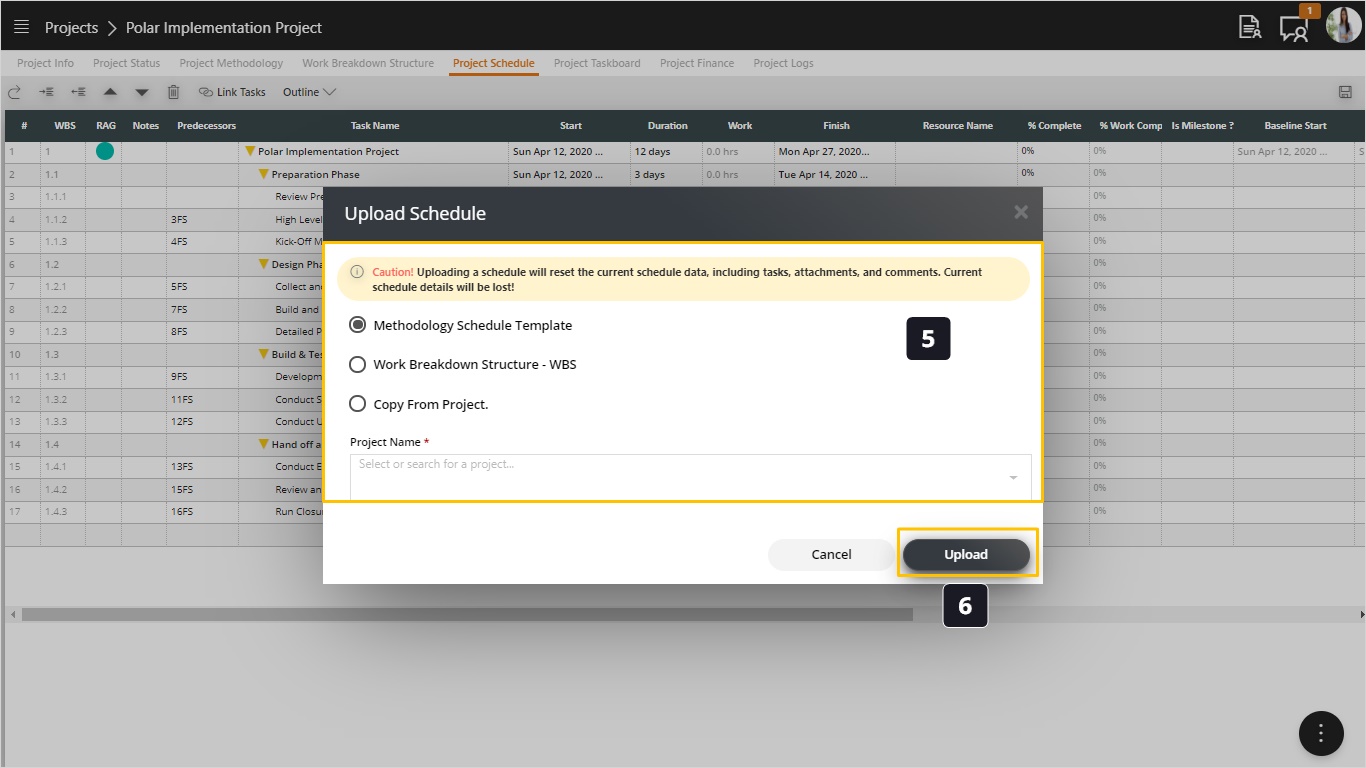
- In the schedule screen we have so many things that you can do. To explore those you can right-click the schedule to see the menu or directly use the keyboard shortcuts (for example, Control-S to save, Control-Plus to add tasks…etc). Here is the complete list of options:
- Edit (Control + ‘E’). This will bring up the edit task popup to show more details about tasks and to modify task attributes.
- Indent (Control + ‘I’). To move a task under another task and formulate a task hierarchy.
- Outdent (Control + ‘O’). To move a subtask out in the task hierarchy.
- Link Tasks (Control + ‘L’). To automatically link the dependencies between the selected tasks. This will set them using the default relation which is Finish-to-Start.
- Insert (Control + ‘Plus(+)’). To add new tasks above the selected task and on the same level.
- Move up (Control + ‘Arrow Up’). To move a task one line above in the schedule.
- Move down (Control + ‘Arrow Down’). To move a task one line below in the schedule.
- Delete (Control + ‘Minus (-)’). To remove the selected task from the schedule.
- Notice that the same operations are also available as shortcut menu options in the top toolbar. There is only one extra option which is the outline, this will show the schedule tasks on the selected level (1 indicated the top level).
- Click Save to save your schedule.
